
Your Cart is Empty


What Is a Moto Van?

If you ride a dirt bike or have been to a motocross event, there's a good chance you've heard about a moto van. With several other terms such as trailers, bike carriers, and pickup trucks used in motocross, it's time to clear the air and, of course, any confusion you may have about what a moto van is.
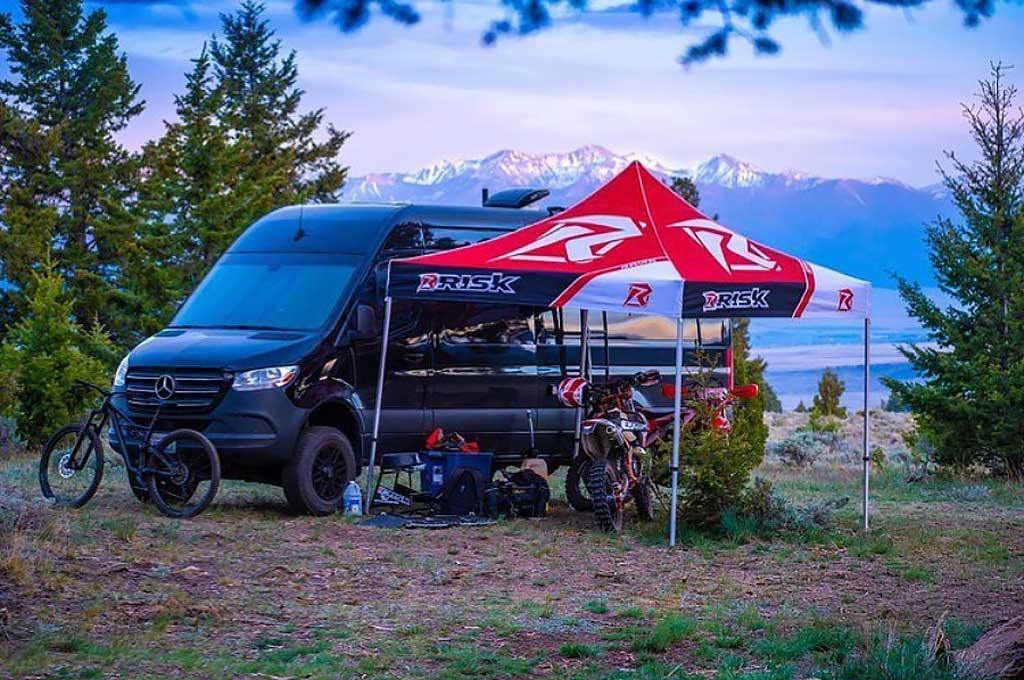
A moto van is typically a van that has been converted and customized to allow easy transportation of dirt bikes and gear to and from motocross races. While the main purpose of a moto van is to haul and transport dirt bikes, it can also be built with living quarters, kitchen, and even toilets.
Moto vans are a hot commodity within the moto industry, so if you need some help getting started on moto vans, how to build one for yourself, and how much it costs, read on!

How Do You Build a Moto Van?
There has to be a way to haul your dirt bikes and gear safely to and from your races without the need for a huge truck and trailer, right? Or maybe you just need a “one vehicle that does it all” mini-RV type scenario. Well, a moto van is definitely all that and more. There are different types of moto vans you can build, depending on your budget. We'll take a look at the basic things you'll need when building your moto van.
Choosing the Ideal Van
There are several types of vans that make for good donor vehicles that can be converted and built into a moto van. Some of the most popular vans are Ram Promaster, Mercedes Sprinter, Nissan NV, Volkswagen Transporter, and Ford Transit cargo vans. Most of these vans have flexible cabin accommodations and can be customized into pretty much anything.
Ultimately, the type of van you choose will depend on your specific needs. The first thing you need to consider is the size of the van. If your goal is to carry one or two dirt bikes, you'll need a compact cargo van like the Ford Transit Connect. A van like the Mercedes Sprinter has a lot of space and is perfect for storing two or more dirt bikes.
If you plan to live in and go on adventures in our moto van, you'll need a van like the Ram Promaster that is sturdy with plenty of cabin space to accommodate your sitting, sleeping, cooking, cleaning, and other needs.
Each van has its pros and cons, so you'll have to consider them when choosing a van. For example, the Nissan NV Cargo Van has a large cabin space but less cargo room. Other things you need to consider are reliability, roof height, vehicle compatibility, convenience, mileage, availability of parts, and of course, price.

Creating a Plan for Your Moto Van
Once you've chosen your van, the next thing to do is to create a layout. Again, this will depend on your needs and requirements. Having a design before starting makes your conversion easier and allows you to customize your van exactly the way you want. It also helps you avoid distractions and unnecessary trouble.
There are several ways you can set up your moto van. If you're struggling to come up with design ideas, check out these 7 setups to customize your moto van. You may also be able to find ideas onPinterest andInstagram; the possibilities are endless.
In the end, you'll have to decide what to include in your setup. Plan everything you'll need along with the purpose of your van, its look, and feel. This should include your bed area, kitchen, bike storage area, and other things you need.
If you are using a fridge, TV, water pump, and fans, you'll need a source of electricity. Harvesting power from the sun is always the best solution when it comes to moto vans.
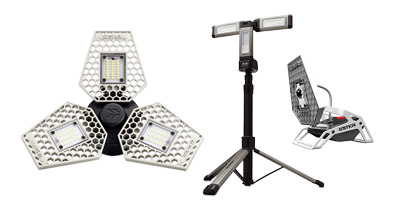
For your lighting needs, there are many different avenues to go down. There are expensive lights that can be hung all around the van, or cheap magnetic light strips off Amazon can do the trick.
STKR Concepts makes a variety of work lights that are great when looking to trick out your pit setup. Whether it be the FLEXIT Solar, Light Mine Professional or the TRiLIGHT ShopLight V2, there is an innovative lighting solution from the friendly folks at STKR that can fit your needs.
For comfort (and convenience), you can include a composting toilet. It is easy to install and manage. Keep in mind that your van conversion can take up to 4 weeks, depending on the design's complexity. To avoid getting overwhelmed, put everything down on paper or screen.

Moto Van Insulation and Ventilation
Proper insulation is important in your moto van. This is especially important if you'll be spending most of your time in the van. Insulation will keep your van warm in the cold and cool when it's hot. It will also keep your heating and cooling bills down and reduce noise when driving.
When you buy a new or used van, it may not have any kind of insulation. There are several materials suitable for wall, ceiling, and wheel wells insulation. Some of these materials are standard building insulation materials. You can use sheep wool, foam board, fiberglass, etc.
While there are many options available, not all of them may be suitable for your needs or preferences. It's important to consider the weather in your area before making your choice. Also, your insulation material should be able to withstand a lot of vibration and act as a sound barrier. This is very important if you'll be driving around a lot.
![]()
It should also be able to resist moisture, mold, and mildew. It is also important that your insulation material is non-toxic and environmentally friendly. Consider the advantages and disadvantages of each material before choosing one.
You'll need to plan all your electrical, gas, and water connections before getting started with insulation. Insulation starts with cleaning the walls. This is a must if you bought a used van. You need to get rid of dirt, dust, mud, grease, wax, or any other thing that can make your insulation less effective.
When installing your insulation, it's best to break up your van into sections. For the hollow sections in your van walls, stuff them with the insulation material. It's also important to use a strong adhesive to attach the insulation material to the walls and ceiling. For your windows, you can use reversible window coverings or curtains made out of insulating thermal fabric.

Moto Van Flooring
It may not be necessary to insulate the floor of your van since heat only rises. It is more important to stuff any ribs and holes in the floor than to lay insulation. If you'll be insulating the floor, we recommend using Extruded Polystyrene (XPS).
After putting up your insulation, you need to install a floor. There are lots of flooring options to choose from, but each has its pros and cons. It is very important to choose the right material as it will affect the rest of your build.
Plywood is a less expensive option, although it may not be the most practical for your moto van as it has low resistance to moisture and can easily chip and dent. A better option is to use water-resistant plywood. Also, because plywood is typically thin, you may use it as a subfloor and install a more durable flooring over it. You can also use it as your ceiling.
Vinyl flooring is still one of the most popular options when it comes to moto van flooring. It is affordable and easy to install and maintain. You can install it over plywood as it is waterproof, more durable, and can last several years.

Laminate flooring is another option, but it's not the most moisture resistant. It is waterproof to some extent, but it will fall apart if attacked by large amounts of moisture. Also, it takes longer to install than vinyl flooring. While both vinyl and laminate are good options, they are known to be toxic and are not the most environmentally-friendly.
Cork and linoleum flooring are other great options for your van floor. They are both durable, water-resistant, fire-resistant, non-toxic, and have a beautiful finish. Carpet isn't a good idea for your van as it gets dirty quickly and is difficult to clean. If you buy a used van and there's already some carpet on the floor, you'll need to remove it.

Installing Your Utility Jug
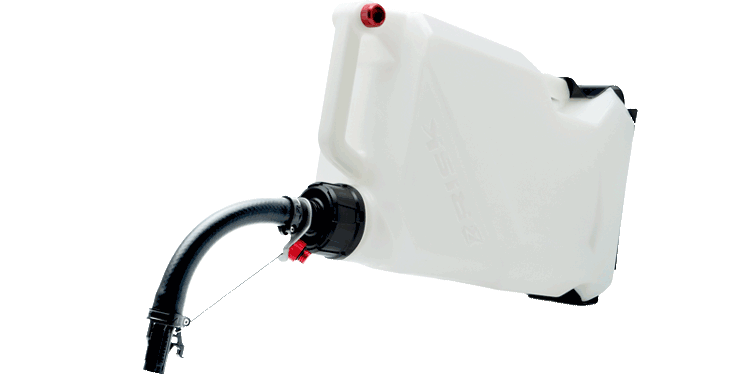
When transporting your dirt bike, it is important to have extra fluids in a separate jug. It allows for a quick, on-the-go top-up. You need a utility jug that is durable, easy to handle, and pours precisely into your bike. While there are a bunch of jugs available, most of them are low grade, difficult to use, and leak easily.
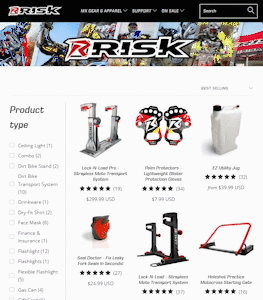
Well, you don't have to struggle with your jugs anymore. The Risk Racing EZ Utility Jug solves these challenges with transporting and pouring gas and is just the perfect utility jug you've been looking for. This gas can is available in a 3-gallon (12 liters) or 5-gallon (20 liters) size, and you can choose what fits your needs.
The EZ Utility Jugs have a triple-handle design that makes it easy to carry and pour out fluid at any angle. One is located on the top, the second on the side, and the third a fingertip handle in the front of the jug. While this design is unique, Risk Racing doesn't stop there. The EZ Utility Jugs are very durable as they are made from thick-walled, high-density polyethylene.
If you've been using the regular utility jug, chances are you've experienced the frustration that comes with fluid spilling from the vent hole. To solve this problem, the vent of the EZ Utility Jug is placed at the back of the top handle, ensuring easy air ingress without any spills.

For transporting your Utility Jug on your moto van, Risk Racing ensures it is easy and hassle-free with the EZ Jug Floor Mount. This is a heat-treated steel frame that you can easily mount on the floor of your van. Once installed, the Utility Jug fits into place and is held firm during transit.
Risk Racing also gives you the option to place a padlock through the EZ Utility Jug to secure it to your van.
Installing a Moto Transport System
Now that you've got everything set up, you need to install a system that holds your dirt bike securely to the floor of the van. Normally, you would need to install tie-down straps, floor anchors, or wheel chocks to keep your dirt bike in place and prevent any back and forth movement of the tires.
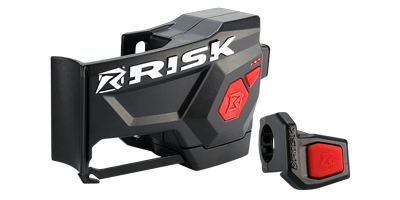
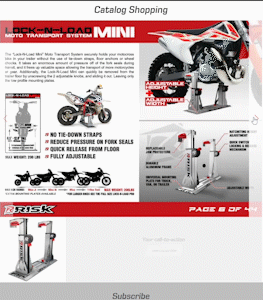
However, there's a simple solution that eliminates all that: The Risk Racing Lock-N-Load Pro Moto Transport System.

The Lock-N-Load Pro allows you to transport your dirt bike in a van, trailer, or truck without the stress of fighting with tie-downs or wheel clocks. This system is very easy to install and frees up a lot of space in your van, allowing you to haul around more bikes. It also takes off a lot of pressure on your fork seals, which makes it perfect for long-distance transits.
The Lock-N-Load Pro comes with a low-profile mounting plate that you install on the floor of your van. Once you've installed the mounting plate, slide in the jaws and tighten the screws on each. The jaws are built tough from aluminum, so there's no doubt about their durability.

The ratchet system in the Lock-N-Load Pro makes it easier to secure your bike. To operate it, simply flip the red switch down, roll your bike in until your footpegs touch the rubberized jaws, and press the jaws down to lock your bike into place. The jaws are rubberized to protect your footpegs and better secure your bike.
To release the jaws and unlock your bike, flip up the red switch and press down a little on the jaws. The ratchet will be released, and you can roll the bike out. If you have a wider bike, the Lock-N-Load allows for lateral adjustability so your bike will fit in. All you need to do is loosen the screws on the jaws and adjust it to the size of your bike.
You can easily remove the jaws of the Lock-N-Load by loosening and removing the screws holding them down. The jaws will come free, and you can slide them out of the mounting plate.
The Lock-N-Load Pro comes in two sizes: the standard Lock-N-Load Pro, which fits a range of bikes from the 85 CCs to 690 KTM Enduros, and the Lock-N-Load Mini, which is intended for 50 CCs to 110 CC trail bikes.
Here's a quick video on how to install the Lock-N-Load Pro:
How Much Does It Cost to Build a Moto Van?
You can expect a moto van build cost to be between $6,000 and $100,000. The cost of building a motocross van varies greatly depending on the type and age of van and the features you plan to install.
As mentioned earlier in the article, there are several vans from which you can choose. If you're buying a new van, it will take a lion share of the total cost. A new van can cost you between $30,000 to $75,000, depending on the version of the van, its features, and its functionality.
If you're buying a used van, you can find options in the $6,000 to $25,000 range for a tall skinny transport van. If you don’t mind an older gas hog that will probably need more maintenance than most, you could go old school and get an older Ford or Chevy full-size van in the $2,000 to $4,000 range.
Some of the more popular moto vans such as the Mercedes Sprinter can be very expensive even as a used purchase. $15,000 to $20,000 is what you can expect to pay for a used Sprinter.

If you're planning to live in your moto van, your budget for the conversion of your van should be between $10,000 and $15,000. When planning the design of your van, your budget needs to be part of your consideration.
So, exactly how much does it cost to build a moto van? Well, depending on the cost of the van and materials you use, features and systems you install, and the quality of the finish, your total conversion cost could be as high as $100,000.
But don't be scared by these large numbers; you can build a simple moto van at a much cheaper cost.
Also, working on the van yourself can help in cutting down your cost. You can also reduce the total cost with other creative and less complex solutions. You also get some control over how you build your van.

Conclusion
Moto vans are one of the ways to transport your dirt bikes to motocross races. You can customize your moto van, depending on how you plan to use it. If you only need it for hauling your bikes and gear to and from motocross events, you can customize it simply.
If you love outdoor adventures and camping or need a place to stay while at the track, you can include a living space, kitchen, toilet, or bathroom. The total cost of your build will depend on the type of van, the features you install in it, and the quality of the materials you use.
The Risk Racing Lock-N-Load Pro is the way to go when it comes to securing your bike in your moto van. If you're looking to buy a dirt bike stand, we recommend the adjustable Risk Racing ATS Magnetic Stand or the RR1 Ride-On Stand.
Leave a comment
Comments will be approved before showing up.
Join the Risk Racing Community
Be in the know! Subscribe for exclusive offers, product launches, and insider tips. Don't miss out!