Your Cart is Empty
Frequently Asked Questions
| Product Table Of Contents |
| Ordering |
| Shipping |
| Questions by Product |
Ordering
- ▼Placing orders outside of the United States
-
Thank you for your interest in purchasing from Striker.
For orders in Europe please visit eu.riskracing.com
For all other international locations please contact us
- ◄How can I track my order
-
Your tracking number will appear on the order status page in your account.
Please contact us if you need further assistance
- ◄How long should it take to receive my order?
-
It takes up to 2 business days to process your order and shipping can take up to 7-10 business days, for orders within the United States.
To find out about the status of your order, go to the order status page in your account or contact us
- ◄How do I cancel my order?
-
There is a limited time to cancel your order. Please contact our customer service team with your request to cancel during regular business hours, (8am-5pm ET).
If your order has been processed through our fulfillment system you will need to wait and return the order.
Shipping
- ▼Do you ship outside of the USA?
-
Yes! In order for us to get you the best shipping rate, please call +1-704-508-1031 or email info@riskracing.com
Orders shipping to Europe please visit: eu.riskracing.com
- ◄How do I get free shipping?
-
Qualifying orders of $199 or more are eligible for free shipping
- ◄If an item is backordered, will the rest of my order ship?
-
Yes. All items that are available will ship immediately.
Any items that are backordered will ship as soon as we receive them in our warehouse. - ◄When will my backordered item ship?
-
Items on backorder will ship once we receive them in our warehouse.
Table of Contents - Click a product icon below to skip to that section
- ▼What kind of batteries does the wireless remote take?
-
Type CR2032
- ◄What goggles will fit with the Ripper?
-
- Risk Racing V3 Goggles
- 100% Accuri Forecast
- 100% Strata SVS
- 100% Youth Accuri Forecast
- 100% Youth Strata SVS
- EKS Zip Off
- Fly Racing Goggle Roll-Off System
- Fox Air Defence
- Fox Vue
- Leatt 5.5 Roll-Off System
- Leatt 6.5 Roll-Off System
- Rip N Roll Platinum
- Rip N Roll Colossus
- Rip N Roll Hybrid
- Scott Fury
- Scott Hustle X
- Scott Split OTG WFS
- Scott Youth Buzz Works
- Smith Roll Offs Kit
- THOR Sniper with Total Vision System
NOT compatible with Oakley Airbrake or Scott Prospect Frame
- ◄Why is my Ripper not working when I press the wireless button?
-
- Make sure The Ripper is fully charged.
- Try re-syncing your wireless remote button (Wireless band is limited to approx. 3 feet max.)
- Replace the battery in the wireless remote button
- ◄Why is there not enough force to pull the string?
-
- Make sure the Ripper is fully charged
- The most common reason is due to the fact that to Roll-Off system is worn out, the gear system is clogged up, or the “friction braking system” on the roll film axle is out of spec causing a high pull force on the pull string
- ◄Why do I hear a grinding sound and no pull?
-
Remove the gear cover and check the health of the gear system. These are wear parts. Replacement parts are available.
- ◄How to replace Gear/Pull Arm Assembly for RIPPER
-
The Pull Cord Hook and Gear Assembly and the Motor Drive Gear are “wear” parts. Depending on use, both items may suffer from general wear and tear. They are available for purchase here. See below for a basic replacement schematic:

- ◄How to replace Gear/Pull Arm Assembly for RIPPER (video guide)
-
- ▼Why is my gate not performing as designed?
-
- Please ensure you have installed a total of 8 NEW “AA” batteries (Old batteries from around the house will not work. The gate requires a full 12 volts to drop so new batteries are important). Make sure you have all 8 batteries installed correctly.
- Double check there is no corrosion on the batteries or within the battery pack, this can impede the amount of voltage the gate receives.
- Check the battery in your wireless remote. Replace the battery with a new battery and try again. The battery in the remote is a “23A”, which is common at most retail stores. It is like the battery in many garage door remote controls.
- The Holeshot Gate electronics may have “lost” the RF wireless signal from the wireless remote. If this has happened, you can typically reset the wireless signal by following the steps below.
- ◄How to reset the wireless remote? (video instructions)
-
- ◄How to reset the wireless remote? (text instructions)
-
- Switch the power button on the base of the Holeshot to the "off" position.
- Remove the electronics unit (i.e., the battery pack casing) from inside Holeshot gate (Figure 1).
- Unscrew the 4 screws on the back of the electronics unit, but **be careful not to yank it apart, because there are connecting wires inside** (figure 2).
- Inside the electronics housing you will find a tiny button similar to the button shown in figure 3 below. Press and hold this tiny button. While still holding the tiny button down, turn the power switch to the "on" position and let the lights flash through their sequence (**continue holding the "tiny button"**).
- When the lights stop flashing, release the "tiny button", and push the red button on the remote.
- This should reset the remote to the electronics. To test, press the remote button again. The LED should now start its usual sequence, which is green for 2 seconds, then blinking red, etc.
- If the LED on the electronics lights up when you press the remote, then this has been a success! It is now time to high-five anyone in the room with you. If no one else is in the room, feel free to celebrate all by yourself.
- If the LED on the electronics didn't react, try the sequence above again. It can be tricky, and you will wish you had three hands, but maybe it will work on the second, or third try.
- If that still doesn't work, maybe you have a bug in the electronics. You can purchase replacement parts by clicking here.
*Please note: the internal electronics can be replaced if corrosion or faulty motor*
- ◄How to replace the Holeshot's wireless electronics? (video instructions)
-

EZ Utility Jugs
- ▼Where can I purchase Replacement Caps or Seals?
-
Replacement pieces can be purchased on the Risk Racing site under Accessories
- ▼Is there maintenance I should perform?
-
We recommend greasing depending on how often the setup is used. For reference, if the LNL is used once a week for a year, greasing should be done at least quarterly if not every other month. This is also a great time to check the health of the springs and the components.

- ▼LNL Maintenance Guide (Video)
- ◄What if there is significant wear on my red knobs, can those be replaced?
The red knobs can be replaced! They can be purchased on our website under “Replacement Parts” or by giving us a call.
- ◄Is the bike stable without tie-downs or wheel chocks?
Yes, the bike is very secure and stable as you drive down the road. The front tire may move a little from left to right but is generally held in place by the rake of the suspension. If you do find movement of the front tire, it will not affect the security of the bike.
- ◄Can I leave my bike clamped in the Lock-N-Load overnight without damage to my suspension?
Yes, the Lock-N-Load is designed to put minimal pressure on your suspension. The bike sits at less than pre-load height and distributes the pressure to both the front and rear suspension.
- ◄Why can I wiggle the bike a little bit when I shake the handlebars or press on the seat?
The Lock-N-Load is designed to hold your bike securely as you travel down the road. When being transported, all the forces on the bike come from the trailer floor and are transferred directly to the tires and footpegs, not the bars or the seat. You can see from the videos online that the bike travels very securely when held in this manner.
- ◄Can I mount bikes close together with the Lock-N-Load?
Yes. In fact, you can mount them right next to each other, shroud to shroud. In a common toy hauler or wide-body trailer, you can mount 4 bikes wide by slightly staggering the handlebars as shown in the image above. You can also mount them fairly close to the trailer wall.
- ◄Will my bike fit in the Lock-N-Load?
We now have two sizes of Lock-N-Loads (The Lock-N-Load and The Lock-N-Load JUNIOR). We recommend using the diagram below to measure your bike before purchasing.
The Lock-N-Load is designed to fit FULL-SIZE MX BIKES, or bikes with similar geometry (Foot peg width from tip to tip: 18”-20” (455mm-510mm), foot peg height: 15”-17.5” (380mm-445mm)).
The Lock-N-Load JUNIOR is designed to fit 85cc MX BIKES, or bikes with similar geometry (Foot peg width from tip to tip: 18“-20” (455mm-510mm), foot peg height: 12.5”-14.75” (320mm-375mm)).
A final note: Often trail bikes WITHOUT a folding shift lever will not fit.

- ◄Can I mount the Lock-N-Load in the bed of my truck?
Yes, we have a truck bed accessory plate that spans the corrugation of your truck bed and mounts the Lock-N-Load in the bed of a truck. This eliminates the need for a brace on the front of your truck bed to prevent the front of the bed from bending. You can also stagger the mounting and easily put three bikes in a standard truck bed without putting one in backwards. Additionally, the Lock-N-Load is quick-release from the truck bed leaving only the low-profile mounting plates so you can still use your truck as a truck! (Truck Bed Adapter plate MFG#:77879 - purchase here)
- ◄Will the Lock-N-Load work with my 2-stroke?
Yes, but the large collector area of your 2-stroke exhaust may be an obstacle. Simply lower a jaw when loading the bike or simply put the bike in backwards. It will work either way.
- ◄Why do the mounting plates have D-Rings?
The D-Rings have nothing to do with the Lock-N-Load. They are simply there as an additional tie-down location for other items you may have. The low-profile mounting plates are mounted to your trailer floor so they might as well be another functional part of your trailer.
- ▼How often should I do maintenance?
-
We recommend replacing the Rubber Top Jaws as necessary. This is a wear-and-tear item that is dependent on how often the unit is used and how aggressive the bike's footpegs are. Replacements can be found at: https://riskracing.com/collections/replacement-parts/products/rubber-jaw-replacement-lock-n-load-pro
We recommend greasing depending on how often the setup is used. For reference, if the Pro is used once a week for a year, greasing should be done at least quarterly if not every other month. This is also a great time to check the health of the springs and the components. After greasing, be sure to not over-tighten the black switch cover.

- ▼LNL Pro Maintenance Guide (video)
-
- ◄Is the bike stable without tie-downs or wheel chocks?
-
Yes, the bike is very secure and stable as you drive down the road. The front tire may move a little from left to right, but is generally held in place by the rake of the suspension. If you do find movement of the front tire, it will not affect the security of the bike.
- ◄Can I leave my bike clamped in the Lock-N-Load overnight without damage to my suspension?
-
Yes, the Lock-N-Load is designed to put minimal pressure on your suspension. The bike sits at less than pre-load height and distributes the pressure to both the front and rear suspension.
- ◄Can I mount bikes close together with the Lock-N-Load Pro?
-
Yes. In fact, you can mount them right next to each other, shroud to shroud. In a common toy hauler or wide-body trailer, you can mount 4 bikes wide by slightly staggering the handlebars. You can also mount them fairly close to the trailer wall.
Just make sure that you leave 7 inches on one side or the other of the floor plate so that you can slide the uprights in and out of the system.
- ◄Will my bike fit in the Lock-N-Load Pro?
-
The Lock-N-Load Pro is available in two sizes (The Lock-N-Load Pro and The Lock-N-Load Pro Mini).
The Lock-N-Load Pro is designed to fit bikes from 85cc to Enduro up to 315 pounds, or bikes with similar geometry (Foot peg width from tip to tip: 12”-21” (304mm-533mm), foot peg height: 12.5”-18” (317mm-457mm)).
The Lock-N-Load Pro Mini is designed to fit bikes 50cc Jr to 110cc MX, or bikes with similar geometry (Foot peg width from tip to tip: 12“-21” (304mm-533mm), foot peg height: 8.5”-12” (215mm-305mm)).
We do recommend measuring your bike to be sure of fit making sure to do so on a flat surface for the most accurate results.

- ◄Will the Lock-N-Load work with my 2-stroke?
-
Yes
- ◄How tight should lock my bike down?
-
The Lock-N-Load Pro has a height-adjustable ratchet system. Lock the jaws down to a height that securely holds your bike. You'll be the best judge of how far you'll need to press down depending on the size of your bike.
- ◄What if the jaw won't lock in the down position? (repair video)
-
- ◄What if the red switch won't stay down? (repair video)
-
- ▼Which Seal Doctor will fit my bike?
-
Small will fit a bike with forks 35mm to 45mm in diameter
Large will fit a bike with forks 45mm to 55mm in diameter

Canopy Tent
- ▼Where can I find spare parts/poles?
-
Risk Racing does have a few spare parts available, give us a call at 704-508-1031

Risk Racing Stickers
- ▼Where can I buy stickers for my bike/trailer/helmet?
-
Stickers can be purchased on the Risk Racing website under Accessories.
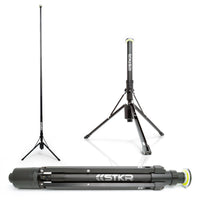
FLi OVER-LANDER
- ▼Initial Startup Guide (video)
-
- ◄Wireless Remote won't turn on Light
-
- Ensure the flashlight battery is charged.
- If the light has not been used in 12 hours or longer, Use the main flashlight power button to turn the light on. Then the wireless remote will continue to work.
- Change the battery in the wireless remote with a new CR2032 Coin Cell 3V Lithium Battery
- Check the battery area to make sure there is not a battery isolator as shown in this video:
- ◄My OVER-LANDER won't close all the way
-
We've put together a quick video that can be seen here below showing the process: Just extend the light fully, flip it upside down, give it a little shake, and then collapse each section starting from the largest. A few turns clockwise on the final light section should do the trick.
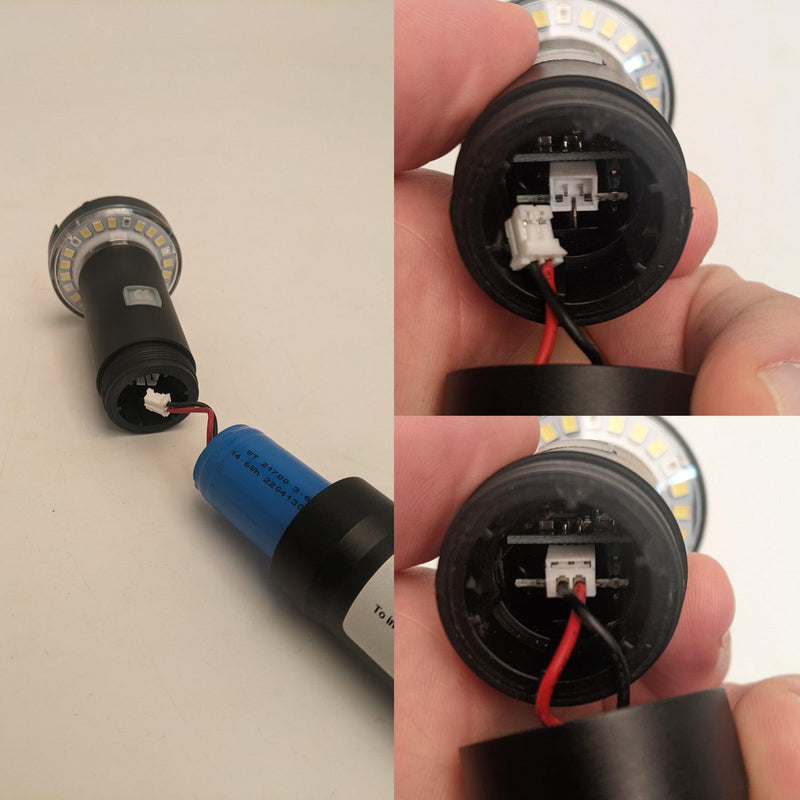
- ▼My flashlight is charged but will not turn on.
-
Be sure to unscrew the flashlight in the middle and connect the battery.
- ◄Wireless Remote won't turn on Light
-
- Ensure the flashlight battery is charged.
- If the light has not been used in 12 hours or longer, Use the main flashlight power button to turn the light on. Then the wireless remote will continue to work.
- Change the battery in the wireless remote with a new CR2032 Coin Cell 3V Lithium Battery
Join the Risk Racing Community
Be in the know! Subscribe for exclusive offers, product launches, and insider tips. Don't miss out!


