
Your Cart is Empty


What are the Best Motocross Grips?

There’s nothing more thrilling than motocross, but some of the fun in the thrill can be lost if you lose control of your bike, right? You and other people can wind up hurt. That’s why you need the best handlebar grips that give you superior control, sensitivity, and grip, but what would those be?
The Fusion 2.0 motocross grips have all of the benefits of a superior motocross grip with none of the trouble. They are easy to install and remove, provide sufficient vibration dampening, great comfort, solid gripping, and are built to endure even the hardest rides.
If you would like to see why these are the best grips on the market as far as I’m concerned and everything you need to know about buying the right grips, then read on.
What Are Motocross Grips For?
For the 0.1% of you who don’t know what I’m talking about, it’s because you don’t have a dirt bike yet. I can almost hear some of you asking “aren’t handlebar grips mostly for show?” To that I say - who on earth told you that?!
The handlebars are what you’re gripping onto for dear life half of the time while your drifting, jumping, or scaling nearly 90-degree hillsides. They are vital pieces of equipment that keep you safe. How? By giving you not only a tight grip but also better control over your bike.
I know that seems obvious, a stronger grip would give you better control, but the handlebars are also connected to the front wheel of your bike, allowing you to get a better feel for how much control you have and adjust when necessary before it’s too late and you land face-first into whoops before you can say “whoops.”
As you can imagine, it would be pretty irritating and even dangerous for you if your grips didn’t have the right texture, weren’t the right size, or managed to even slip off.

How Do You Apply Most Dirt Bike Grips?
For such a simple piece of equipment for a dirt bike, you would be surprised how many ways there are to attach grips to the handlebars.
Glue
The original method, applying grip glue is also an annoying one. The goal is simple: apply glue all around the inside of the grips and on the handlebars. But the process is a mess and unreliable. It’s nearly impossible to get consistent coverage and you have to wait a day for it to dry. By the time you’re finished, the brand you chose might not even have the adhesive power you wanted.

Safety Wire
This is another common, but annoying, method. You might have noticed a lot of grips have deep grooves. These grooves are where you’ll wrap the safety wire. You start at the end closest to the clamp area, wrap the wire around the first groove, use pliers to twist the wire, move to the next vertical groove, and repeat until you get to the other end. Then you create a tail, cut off the excess, and stick the end into your grip. It doesn’t take long for the wire to dig in and tear up the grips themselves, or start sticking you.

Zip-ties
Although not the most secure method, zip-ties do mean you don’t have to wait for anything to dry. Take 4 zip ties, put them in the new grip, spread them out evenly, and wiggle the grip back and forth onto the handlebar, keeping the zip ties spaced as you go. When you’re half an inch away from having the grip all the way on, take a wrench or pliers and pull the zip ties out.

Lock-ons
Lock-on grips are completely distinct from slip-on grips, which usually need the glue or wires to install. This is the quickest way to replace your grip, and can come in handy if your existing grips slip off suddenly and you an immediate replacement. The issue with this grip is that if you already have an aluminum throttle tube, the grips won’t lock into place. Be sure to have the right tool to tighten the screw into place.

Hairspray/Spray Paint
For the love of all that is good and holy, do NOT use these ideas unless you are truly desperate! You’re out of grip glue, you don’t have lock-ons on hand, and you don’t even have zip ties in your garage, then these sprays can act as a grip glue temporarily. Just spray into the grip to avoid a mess.

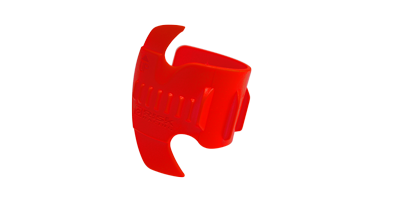
With your new grips,don’t forget to pay attention to the diameters of the flanges. The bigger one will be installed on the throttle side and the smaller one will be installed on the clutch side.
How Long Do Dirt Bike Grips Last?
This really depends on how hard a rider you are. The more you ride and the rougher your chosen terrain, the sooner your grips are going to get damaged or worn out.
For the most intense of us, we might have to replace our grips as frequently as every 2-3 months. Moderate riders who ride fairly frequently will probably need to replace their grips every 4-6 months. If you ride only occasionally because your day job doesn’t allow for much more than that, you probably won’t have to replace your grips for about a year.
Still, even your grips look good after a year, I would suggest replacing them anyway, especially if you used glue to hold them in place, because old glue gets brittle and your grip will likely start slipping off suddenly and at the worst times.
How Do I Choose Handlebar Grips?
As you’ve probably noticed in your research, there’s a wide variety of grips to choose from. That’s surprising considering not too long ago, the grips were considered less of an essential piece of gear and more like decoration.
Still, all of these choices make picking one pretty overwhelming. I can tell you there are 5 factors you want to look at before you make a decision:
- Material
- Texture/pattern
- Vibration reduction
- Size
- Installation Method
Materials
Handlebar grips are not made equal. They are usually made with firm, medium, soft, or multi-density composite materials. Each has its own pros and cons.
Soft composites conform to your hand and are squishy, giving you a great grip and dampening vibrations the best. The issues with soft grips are that they will rub against your skin more, causing blisters and wearing out gloves sooner.
Hard or firm composites provide the least grip but will last the longest and won’t cause as many blisters. Medium composites are somewhere in-between. Neither great at dampening vibrations but not the most durable either.
Multi-density composites do what medium composites can’t: be the best of both soft and hard composite worlds. They have double or even triple compounds, with a hard interior composite surrounded by a soft exterior composite.

Installation Method
Like I mentioned earlier, there are three ways handlebar grips come with in their packaging - glue, wire, or lock on. Out of these three glue is the most secure, but lock-ons are easier. However, there is another method that is even easier than the lock-on and requires no drying time, but we’ll get to that later, so stay with me here.
Texture/Pattern
There are three different patterns grips will have:
- Waffle
- Diamond
- Pillow
All three of these patterns are made to try to improve your grip, and therefore your control over your bike. Some patterns do it better than others and are often combined.
Waffle textures provide a firm grip, even in muddy conditions, but not with full waffle coverage. Half will do. It’s not the most durable either.
Diamond patterns provide a thin circumference for small-handed riders and provide a firm grip and more comfortable experience.
Lastly, pillow-top textures have great vibration dampening capabilities and grip in wet conditions, but may be too large for small-handed riders.

Size
Dirt bike handlebars come in one of two sizes:
- ⅞” diameter
- 1-⅛” diameter
It’s easy enough to tell which one you need by taking a tape measure and wrapping it around the clamp area in the middle since it will have the same circumference as the handles. 1-⅛” handlebars are the favorite of hard and heavy riders who need the extra strength they come with.
Vibration Reduction
In relation to size and material, you have vibration reduction. They’re all related, by how thick they make the grip. Low-profile grips will allow you to have a better feel over your bike’s handling, but bulkier grips will usually fit better in your hands and reduce vibrations better.
When Should I Change My MX Grips?
Your grips are essential for comfort, control, and balance, so you’ll want to replace them before it becomes dangerously necessary. There are several signs letting you know that you need to replace your grips soon:
- The rubber/foam starts to shred
- The tread of the grips are worn and bald
- The end of the grip or the flange tear or fall off
- Your grips are bending and sagging
- When your grips become hard
- When the grips get way too sticky

Shredded material is going to pull off completely eventually. Shredded rubber also means the grip won’t feel right in your hand and your grip may be compromised. The most obvious sign is when your hand starts slipping because you’ve worn the grips out.
Bending or sagging can happen when the adhesive you used starts to fail or the material is wearing out, causing an unnatural and loose grip.
When the rubber becomes hard, the material is brittle and won’t withstand impact as well. Finally, as much as you want a good grip, being stuck to one won’t help you either.
You can remove your old grips with a box cutter or compressed air.
Hassles Of Most Handlebar Grips
If we’re honest with ourselves, handlebar grips for our dirt bikes are not comfortable most of the time. Most of you know what I’m talking about. There are countless times we’ve contracted those infuriating and infamous Yamaha blisters because our thumbs were scraping against the grip flange. Gah, I can feel it just by thinking about it!
Comfort isn’t the only issue with most handlebar grips. The worst problem is that no matter how hard you try to keep them secure with glue and security wires, they end up slipping anyway! This isn’t just super irritating because of the time, physical effort, and often the mess you had to deal with, it can also be dangerous.

What Are The Best Motocross Grips?
If you’ve been with my team and me here at RISK racing for any length of time, you know we strive to fix common problems in motocross gear and tools that only actual riders are aware of.
We’re passionate about bringing you the best riding experience of your life, so we tried our hand at crafting some grips to see what we could do about the installation and comfort issues.
You also won’t be surprised that, being exceptionally proud of what we do, we consider our grips to be the best, but hear me out and you’ll see why.
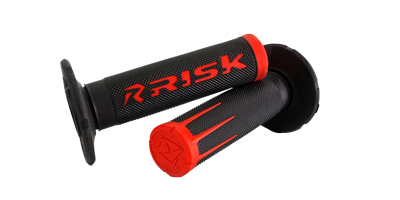
Our RISK Fusion 2.0 grips take care of all the biggest problems - messy and tough applications, slipping, wires sticking into you, flange blisters, and slippery textures. If it sounds too good to be true, here are the features that beat the problems:
- An ergonomic flange
- Two-finger gripping ribs
- Dual compound material
- Secure-grip micro texture
- Double-walled grip end protection
- Fusion bonding system
Our “wave” flange turns away from your thumb, where blisters happen most often, and the gripping ribs provide the most grip texture where it counts - with your last two fingers.

The dual-compound construction provides the secure and durable fit of a hard composite and the excellent grip and vibration dampening of a soft composite. Even the ends won’t tear off after tip-overs because they’re double-walled. Even though we have a dual compound material, we’ve kept the diameter nice and trim for you so that gripping is easy.
And the best part? The mess-free, easy, and instant application process. Absolutely pain and slip-free, and we’ll show you how to do it.
How To Install RISK’s Fusion 2.0 Grips
The process couldn’t be simpler! It’s really just a four-step process, but for the sake of being thorough for any new dirt bike riders out there, I’ll start from the top.
Clean Handlebars Thoroughly
In order for any adhesive to bond with the grip and the handlebars effectively, the handlebars need to be clean from any dust, dirt, and debris from the previous grips. Take some Windex or other alcohol-based cleaner and wipe off any dirt and residue left behind. Make sure the handlebar is dry completely before moving on to the next step.
Apply the Bonding Strip
Take your bonding strip and peel off one side of the paper. With the middle of the bonding strip, start from the underside of the handlebar and fold one side around to the top of the handlebar. Be sure to leave the tiniest bit of the strip hanging off the end.

Before doing the same with the second half, peel off the other backing of the bonding strip, at least far enough back that the other half of the strip won’t fold over on top of it. Then the strip just won’t work.
Now just fold over the rest of the bonding strip and peel off the rest of the backing. Be sure to press in the hanging end of the bonding strip so that it doesn’t get in the way of your grip and peel off.
Spray on the Catalyst
Give your bonding strip a few spritzes all around so really make the strip secure and fuse better with the grip. Put a few squirts down the grip for good measure.

Slip-on Your Fusion 2.0 Micro Texture Grips
Now just slide your grip into place. Wiggle it back and forth if you have to, but you’ll never have an easier time than this. You don’t have to worry about dry time, but in case you were wondering, 15-minutes is all the time you need to let the catalyst bond completely.
As you can see, besides your pocket knife, you don’t need to bring any special screwdriver with you.
Now, right now you’re probably thinking, “If it’s so secure it’s probably hell to take off again.” And to that I say THINK AGAIN! We already thought about that too! All you have to do is use a knife to cut down the middle of the old grip, take it off, use your knife down the middle of the strip, and pull it off.

Final Thoughts
I’m not so vain that I’m going to say all of you are going to think our grips are the best. It’s going to take some experimentation for you to find the grips that are your favorite. What I will say is that we’ll at least be your second favorite if not your first!
Leave a comment
Comments will be approved before showing up.
Join the Risk Racing Community
Be in the know! Subscribe for exclusive offers, product launches, and insider tips. Don't miss out!
Email Sign Up Text Msg Sign Up