
Your Cart is Empty


How to Change Handlebar Grips on a Dirt Bike: 2 Methods, Step by Step

If you’ve ever had a worn-out grip slip on you, you know the important role handlebar grips play in two of the most important aspects of riding a dirt bike: steering and balance. Indeed, worn-out grips can be uncomfortable or even cause accidents, and you need to replace them as soon as you notice any issues.
The change the handlebar grips on a dirt bike, first remove the worn-out grips. Then clean the handlebar and add new adhesive. Next, slide on the new grips and wait the required amount of time for them to cure.
The problem is, the installation process varies with the grip type, and the sheer number of intricacies involved can sometimes make things tricky.
In the rest of this article, we’ll discuss the above steps in detail and compare the installation process of Fusion 2.0 Moto Grips with that of conventional grips to help you decide the best option for your dirt bike. Let’s dive right in.

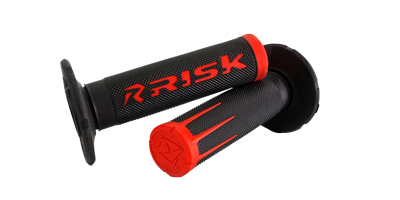
How to Change your Old Grips to New Fusion 2.0 Grips from Risk Racing
To change handlebar grips on a dirt bike to the Fusion 2.0 Grips, you’ll need to remove worn-out grips, clean the handlebar, apply bonding strips to the handlebar, apply Fusion Spray on the bonding strips, slide your grips onto the handlebar, and wait for at least 10 to 15 minutes before using your bike.
Remove Worn-Out/Old Grips
The way you remove your old grips will depend on their type. If they’re Fusion Grips, all you need to do is cut out the worn-out grip and peel off the bonding strip.
If your bike previously had conventional grips, the easiest way to remove would be cutting them out with a box cutter. Start by cutting safety wires off your old grips if they had this kind of wire. Next, cut along the length of the grips and remove them.
Keep in mind that doing this will mean you’ll have to throw away the grips. If you’re planning to reuse them later on, removing the grips will take much more effort to get them off without damaging them.
Here are the steps:
- Spray a contact cleaner to weaken the adhesive bond holding the old grips in place. Use a screwdriver to lift the grip's ends so that the contact cleaner gets underneath and acts on the grip glue between the handlebar and the inner side of the grip.
- Let it sit for a while and try pulling off the worn-out grips.
- If it’s still difficult to pull the grips off the handle, try applying a lubricant in the same way you did your contact cleaner.
- Repeat the process until your grips come off.
Another method to remove the grips from the handlebars quickly is by using a compressor gun. Put the nozzle of the gun near the inner part of the grip and force compressed air into the glue seal to pop it. The grips will come out easily provided they aren’t torn, or their ends haven’t been cut off.
If your dirt bike has an OEM stock plastic throttle, the grip on your handles may be vulcanized to the throttle tube. Removing such grips from the handlebars might prove difficult, especially if you don't want to damage them. Instead, consider replacing it with an aftermarket aluminum throttle tube. Aluminum throttle tubes are more durable and will not bend or distort easily in the unfortunate event of an accident.
Additionally, a new throttle tube will give you better throttle response during those adventurous journeys.
Clean the Handlebars
Cleaning your handlebars thoroughly will ensure that your new grips bond firmly to the handlebars. The grime that often forms on the handlebars of your dirt bike can compromise the strength of the bonding, and thoroughly cleaning it can enhance your grips' durability.
To clean handlebars that were previously fitted with conventional grips, you’ll need a contact cleaner (preferably acetone), sandpaper, a clean rag, and possibly a wire brush or a scouring pad. With these at hand, start by sprinkling a good amount of contact cleaner on a clean rag.
Next, use the rag to wipe off remnants of the old grip glue and grime from the handlebars.
Even if your bike previously had fusion grips (meaning no glue remnants), sweat accumulated overtime may be deeply ingrained in the handlebars, making it almost impossible to remove with just a rag.
In such a case, use a wire brush or a scouring pad to clean your handlebars. The extra abrasion will help make cleaning much easier and effective, whether you’re cleaning glue remnants or just sweat and dirt.
After you have cleaned all the grime, be sure to use sandpaper or a file to file both ends of your handlebars. This will help keep the handles blunt, so they don’t tear up your new grips when you fall or lean your bike against a wall.

Apply Bonding Strips to the Handlebar
Peel off the backing on the bonding strips and apply them on your handlebars the same way you would a sticker. Be sure to leave a little of the strips on the end to press into the handlebar.

Spray Fusion Spray Onto the Bonding Strips
Once fitted onto the bar and neatly pressed in, spray the bonding strips with the Fusion Spray catalyst. At first, the catalyst will act as a lubricant to help you guide your grips into the right position on the handlebar with much more ease. When it dries, later on, it’ll help strengthen the grip-handlebar bond.

Slide Your Grips Into Position on the Handlebar
When doing this, take your time to position your grips exactly where you want them on the handlebar. You don’t have to rush like you would when using glue for bonding. The Fusion bonding spray takes about ten minutes to dry, so you have more than enough time to get your grips’ positioning right.

Let the Bonding Dry Before Using Your Bike
Wait for at least 10 to 15 minutes for the grips to bond to the bar before you hit the road. If you’re not in a rush to use your bike, give it about half an hour. This is approximately the time it takes for the bonding strips to fully dry, and the bonding will be strongest then.
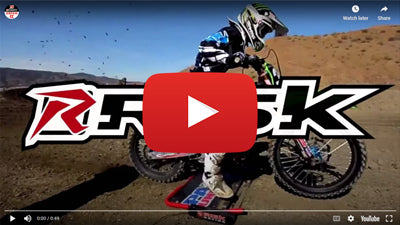
In case you get lost along the way, here’s a video of Risk Racing owner, James Burry, demonstrating the full installation process:

How to Install Traditional Grips on a Dirt Bike
Since we’ve already covered removing old grips and cleaning the handlebars, we’ll get right to the steps. But before that, let’s get two things clear:
- Grips always come as a pair and the one with a larger diameter should be fitted on the throttle bar. Many bikers tend to mix them up, so it’s important to separate the two types before you begin the installation process.
- Since working the grips into the handlebars can be tricky (especially for first-timers), you need to warm up your grips before sliding them on to the handlebars. Seasoned mechanics use this handy trick to soften the rubber construction of grips to make it easier to manipulate them onto the right position on the handlebars.
You can use your everyday hairdryer to warm up your grips. If you don’t own one, you can use any other form of mild heat. Just be sure not to use direct heat, too high temperatures, or heat your grips for more than five minutes because any of this can melt or burn them.
With your grips warmed up and sorted, you can begin working them into place using the following steps:
Create a Small Hole at the End of Each Grip.
This will allow air to escape as you push the grips onto the handlebar, which will improve the bond's adhesive strength between the grips and the handles by eliminating air spaces. It will also create space for handle guards if that’s something you’re looking to install on your bike later on.

Apply Grip Glue Onto the Handlebar and Along Your Grips’ Edges
Applying glue on the handlebar allows the glue to work its way along the inner length of grips, improving the strength of the bond.
If you don’t already own grip glue, there are many well-priced options on sites such as Amazon to get you set up.
Slide the Grips Onto the Handlebar
Use one smooth motion to gently slide each grip along the handlebar until you reach the desired position. This way, you’ll evenly spread the grip glue onto the handlebar and the inside of your grips, which will boost the bond's strength.
You’ll want to avoid letting the grip glue sit too long before fitting the grips onto the handles because, like many other types of glue, it typically dries pretty fast. That means if you don’t slide the grips onto the right position immediately, the glue might dry when you’re still trying to adjust the position of your grips.
If this happens, you might end up fitting your grips on the wrong position on the handlebar, which won’t be ideal.

Install Safety Wire on the Bar Grips
Once the glue has dried, wrap safety wire around the grips. For some riders, this isn’t a must-do because the grip glue provides a pretty firm bond, and safety wires don’t affect the handling of a bike. Those who choose to install them do it as a precaution in case the glue fails.
Ultimately, whether you decide to wrap your grips with safety wires will be up to you.
In case you choose to install safety wires, here are the steps for wiring down each grip on your bike’s handlebar:
- Wrap the safety wire around two locations on the grip and straighten the ends of the wire out. The double wrap won’t just prevent your grip from slipping off; it’ll also help keep water out.
- Twist the straightened ends together using a pair of pliers. You can use regular multipurpose pliers, but safety wire pliers are better suited to this kind of work because they twist and lock automatically and evenly with a light pull on the handle.
If you don’t already have a pair in your toolbox like many other dirt bikers, consider the BikeMaster Safety Wire Pliers. This pair’s heavy-duty spring provides superior clamping force for faster set up and minimal wire slippage, and the stainless steel construction ensures long-lasting service.
- Once you’ve twisted the wire, cut it on the twist about 0.25 inches (6.35mm) off the surface of your grip.
- Next, bend down the cut end of the twist and neatly tuck it under the safety wire wrap. Double-check that each sharp end of the twist is tucked under so it doesn’t ever catch on your glove when riding.
Basic Rules for Installing Traditional Grips on a Dirt Bike
As you work your way through installing traditional grips on a dirt bike, there are general “unspoken rules” you’ll want to observe to make sure everything goes smoothly. While these might seem somewhat obvious for the experienced biker, they can be life-saving for a novice rider:
- Make sure that the treads on your grips are facing out before fixing your grips. Otherwise, you risk installing them inside out. If you’re installing half waffle grips, ensure that the waffle side is facing down.
- Always apply grip glue on one grip and work it into the right position on the handle before moving on to the next. This way, your grips won’t stick to each other.
- If you often ride at high speeds, consider plugging the ends of your handlebars with a coin. This simple hack will help prevent dust from piling up inside your handles when cruising at high speeds in dusty conditions. It’ll also make your handles less dangerous in case the dirt bike falls on you during an accident.
- Always wipe off any excess glue on the handles. Your bike will look much better without excess glue dried on the handles. Also, be sure not to get any glue under the throttle tube because it will attract dust to an area you’ll want to keep as clean as possible.
- When positioning your double wrap of safety wire, let the grooves on the grips guide you. Ideally, you’ll want to set the wire inside the groove. This way, the wire won’t interfere with the grip’s traction and comfort.
And since the last groove on each end of the grip is usually a few inches off the handlebar's end, setting the wire inside the groove will also help minimize the chances of the wrap slipping off.
- If your grips don't have grooves, make sure that you position the safety wire wrap at least 12mm from the handlebar's end to prevent it from slipping off.
- When tucking in your safety wire twist, always bend it towards your bike’s front. This way, you’ll minimize the chances of the wire catching your fingers as you grab onto the grip.

Installing Fusion Grips vs. Traditional Dirt Bike Grips: Which Is Easier?
It’s easier to install Fusion Grips compared to traditional grips due to several reasons.
- Fusion Grips don’t require grip glue since they come with their own specialized bonding system. With grip glue, it can be tricky to position your grips right because it dries fast, and you have little time to make any adjustments. On the other hand, the Fusion Bonding System gives you up to 15 minutes to adjust the position of the grips.
- The Fusion Bonding System doesn’t require safety wires, unlike grip glue. Even when tucked in right, there’s always the risk of the wire poking your hand when riding. And while the safety wire is optional when fixing traditional dirt bike grips, leaving it out can increase the chances of the grip slipping out in the middle of a ride, so it’s a “necessary evil.”
- Fusion Grips are easier to work with than traditional grips. Once you’ve cleaned the handlebar, installing Fusion Grips is more or less like putting a sticker on your handlebars. Also, the Fusion catalyst acts as a lubricant when installing Fusion Grips, making it easier to slide each grip into the right position.
With grip glue, it is much harder to guide the grips into place on the handlebars, not to mention that you have to do it pretty fast. Excess glue can also leave unsightly marks on your bike or even attract dust to the throttle tube.
- It’s easier to remove worn-out Fusion Grips than traditional grips. Again, the bonding system makes all the difference. Since Fusion Grips don’t use grip glue, they’ll be easier to remove when they get old. You only need to cut out old grips and peel off the bonding strip instead of cutting safety wires and scraping glue remnants off your handlebar.
Fusion Grips are easier to install compared to conventional grips. What’s more, we’re currently working on a few patent-pending tweaks to prevent blisters on the side on the thumb in riders.

Summing Up
That does it for today’s post. Hopefully, you’ll be able to use the above steps to install new handlebar grips on your dirt bike and leverage the handy information in this discussion to decide the best grip type for your needs.
For more useful info about dirt bike repair and racing, check out ourblog. Be sure to sign up for the newsletter so you don’t miss out on cool deals, new releases, the latest news, and much more.
Leave a comment
Comments will be approved before showing up.
Join the Risk Racing Community
Be in the know! Subscribe for exclusive offers, product launches, and insider tips. Don't miss out!
Email Sign Up Text Msg Sign Up